Categories
ads

IPL epilator CkeyiN А110

Apparently, this is due to the increased sensitivity of the areas processed in manual mode. Power: 36W Brand/Model: CkeyiN A110 Commercial packaging of medium size gives an initial idea of ​​the device. In this case, the price is quite democratic. It gives a strong flash and heats up at this moment. Mode: 2 (automatic, manual) According to observations, we can say that after the first procedure there are no visible changes, the hair continues to grow.
For
to switch to automatic mode, you need to hold down the top button for two seconds. Resource: 999999 flashes The laser acts with electromagnetic radiation in the visible range in a narrow direction. If this is not done, it will turn off automatically after five minutes. Levels power: 8 The A110 does not have a skin tone and hair color sensor, but it would be more expensive. In the photo, the lamp is not turned on – this is how the camera sees, and the reflection of the flash gives the glass. IPL hair removal allows you to get rid of atavisms without leaving your home. After that, the display starts to glow and the fan rotates. There are injuries, sunburn – IPL should be postponed. The machine is not always appropriate, wax is painful, laser hair removal requires trips to beauty salons. There are eight levels in total and you should choose the right one taking into account skin tone and hair color, and for the first time it is always at a minimum. No. Both methods are based on exposure to light. When the AC adapter is connected, the LED starts to blink steadily. Flash can be obtained no more than once every two seconds. In general, the cycle is designed for 6-10 procedures and by the end the result will be undeniable.
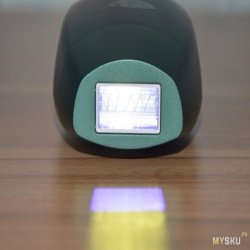
Attention was attracted by the network adapter. The lamp will flash only when the device is brought to the skin. Review published in accordance with clause 18 of the Rules Due to ethical reasons, I do not give a photo of the results of the work, and I hope you will not judge. Specification: As a result, I conclude that the epilator works and copes with the assigned functions. The characteristics and purpose of the structural elements are indicated at the back. It does not work well or does not work at all on gray, bleached and red hairs. The flash was never caught by the camera, but it is clearly visible on the video. In addition, there are restrictions on the condition of the skin. In both cases, the light penetrates the hair follicle and affects the hair follicle and hair root. Voltage: 110-240V 50/60Hz To date, there are different methods – the traditional machine, gels, wax, laser hair removal and the IPL method. To turn on the subject, the button must be held down for three seconds. Weight
net: 356 gr. Automatic is designed for large areas of the body, manual is more convenient to use in the lips, bikini area, etc. The product was provided for writing a review by the store. It usually lies in the hand, and with a weight of 215 grams it is not perceived as a plastic toy. Laser procedures act pointwise and require the work of a specialist in a beauty salon, and this time and tangible money.
The machine and glasses in the kit are cheap and if the first one was put down out of politeness, then glasses, as a means of protection, are quite appropriate. The length of the cord is 1.35 meters, but the main thing is that the adapter is designed for a high current consumption of 3 Amperes and must provide powerful flashes of the device. And IPL is not at all recommended for people with dark and close to that skin color. In whatever mode the device is turned off, it always turns on manually and at minimum power. To begin with everyday language, let’s define the difference between laser hair removal and IPL. To get a flash in manual mode, briefly press the top button. IPL technology is based on the use of a broadband pulsed light source and any person at home can handle devices of this type. The fact is that a fan is installed in the device to cool the lamp. There is no battery in the device, it works from the mains. At home, hair removal is painless and permanently possible. The laser method gives a faster effect, IPL requires several periodic procedures. 
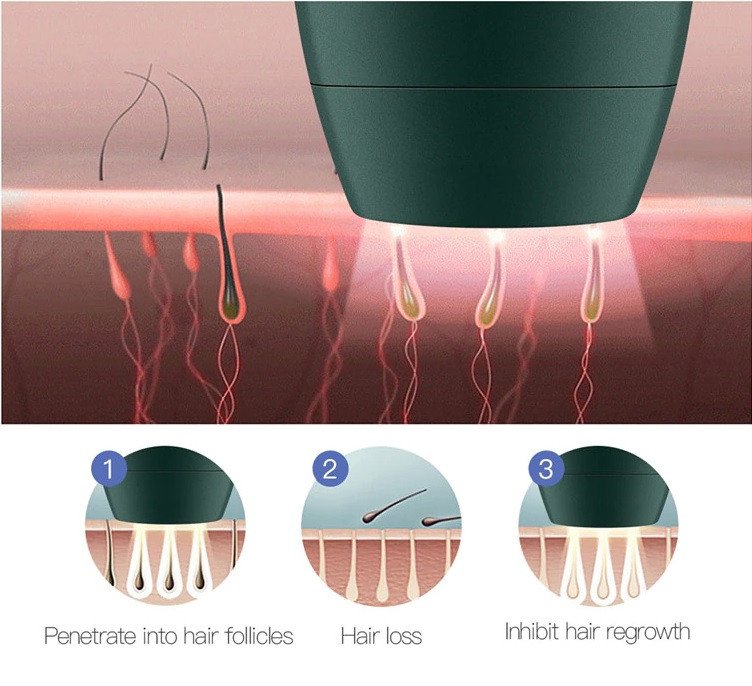
Material: ABS When the epilator approaches the skin, flashes will follow at a frequency of approximately once per second. Warmth is perceptible, but not at all
critical for the user. For this, the device is equipped with a special sensor. IPL devices are inexpensive and today we will consider the model from CkeyiN – A110. The contents are packed in a plastic blister and include, in addition to the epilator, power supply and instructions, a regular machine and goggles to protect the eyes from bright light. The epilator can work in two modes – automatic and manual. Together with the strong shading, this is reminiscent of welding goggles, but it’s all justified. Not the point – it does not affect performance in any way. Everyone has unwanted hair and everyone deals with it in their own way.
Since photoepilation is based on the action of light on the coloring pigment of the skin and hair – melanin, IPL is not suitable for everyone. The same area is recommended to pass for the procedure no more than two times. No need to wait for the hair to be removed immediately and permanently. On the top side there is a large digital display and a mode selection button. In the light, the world in them acquires a greenish tint. The shape is more like a bun. Hair must first be removed in any acceptable way, and only immediately after that comes the turn of the epilator. The procedure is extended in time and in several doses with a frequency of two weeks. After the second growth slows down, after the third and fourth, the last one today, the hair becomes much smaller and thinner.

The desired flash power level depends on this. Those. the security algorithm is thought out here.
The body of the epilator is made of plastic and painted green.
Adjusting the flash power is done by briefly pressing the power button on the bottom. How does it work in reality? The photo below shows how to apply the epilator.

IPL epilator CkeyiN А110

The manufacturer claims a lamp life of 999,999 flashes. It seems that we are dealing with OEM production, as the brand name is indicated on the sticker. The frequency is higher here, as the skin of large areas of the body is less sensitive. And even the same person needs to change the power level depending on the treated areas of the body.
The epilator turns off in the same way.
The lamp is located in the front part behind the coated glass.
The dimensions of the device make it possible to take it on the road, vacation, etc.
There is a fan grille and a power button on the bottom. The decreasing number of remaining resource is displayed on the indicator and decreases with each flash. CkeyiN A110 is just a device for such cases.
The power socket is located at the bottom framed by the ventilation grille. However, both methods are effective, the only question is time and money spent.
The primary role is played by skin tone and hair color.

Categories
ads

OBDII Bluetooth Car Diagnostics…

In real life, the case turned out to be a little larger than expected. The product was bought so as not to go to the service when the CheckEngine light came on in the car. In general, I https://jiji.co.tz/supplements/gainer am satisfied, it remains to install it normally in the car 🙂 The case of the device is made of high-quality durable plastic.

OBDII Bluetooth Car Diagnostics by OBDII

When connecting, keep in mind that the bluetooth code is 6789. I stuck it in Kalina, the program on the PDA quite successfully receives all the data from the device.

Categories
ads

SQ8 Mini DV Camera 1080P Full HD Car DVR – Mini Universal DVR Camera

This is a megapixel widescreen sensor often used in cheap security cameras. In some cases, this may be interesting.
Before the declared characteristics, welcome to the site. SPECIFICATIONS

SQ8 Mini DV Camera 1080P Full HD Car DVR – Mini Universal DVR Camera


Inside the package there is an instruction, a universal power cord – video – data transfer https://jiji.com.gh/bath-body/lightening, a clothespin, a stand-leg and a small camera! Looks strong. On the side there is a USB port, an SD card slot and a hidden reset button. Tested continuous camera run time is approximately 1 hour, not 100 minutes as stated in the manual. Superfluous. This is the package in which the SQ8 Mini camera comes (I don’t know why, but my hand took it and put it next to the rulers from a cheap Chinese stationery) I didn’t even expect. I had plans to use it mainly as a DVR in a car – I saw the mount leg in the kit in the photo. There and pictures will be better than mine, by the way. By the way, an additional line is displayed at the bottom of the analog video with the recording time and the current time. Well, not a metal of course, but an alloy. But it was not there! A clothespin from the kit clings to the camera itself – it snaps into special grooves. I will say that the attached instructions honestly indicate the sensor used – OV9712. Despite the fact that the camera body is made of some kind of alloy, it weighs only 26 grams with a memory card. But it’s worse with the stand – although it has a spherical connection with a gear platform for a clothespin, as soon as I didn’t twist it, I didn’t understand how you can find the position in which it looks in front of you, and not at the sky. And here is the manual that came with the camera So, first things first. In addition, the camera can take 12 megapixel pictures. I will only describe what I received and what you can use. The price is quite ridiculous – for that kind of money you can only buy a car recorder with a soapy image. Enough impressions. I will not describe this mode either – who cares about megapixel photos blown up to 12? Thus, I will not describe everything related to this mode, since its use is stupid and unjustified.
Repetitions of the characteristics from the site, too, who are interested can follow the link and learn plenty. But not Full HD, as further written in the manual for the camera! Therefore, the FHD mode is nothing more than interpolation, which was confirmed by me during the test.

Don’t ask why I bought this mini camera. Everything else seems to be true: There is a very weak IR illumination, you can display the date and time on the screen, you can write by movement. There will be no photo of the parcel. This is nonsense. To be honest, I saw FullHD and 1080p in the description and wanted to.
Sturdy body, minimum control, there is nothing special to break. I saw it – I wanted it. In normal lighting, it basically gives quite a decent image. Externally, the camera is really solid. The IR LEDs are painted in the body color. Moreover, a little distorting color reproduction and wildly noisy in low light. The camera has an all-metal body. Of the controls – two buttons on top. The USB cable has an analog video tulip branch, from where a real NTSC signal is output. The camera is really small.

Categories
ads

1-megapixel Wi-Fi IP camera Szsinocam SN-IPC-4024CSW

The main features are indicated on the box:

1-megapixel Wi-Fi IP camera Szsinocam SN-IPC-4024CSW

https://jiji.com.gh/17-led-tvs/uhd

  • Cloud P2P support, direct connection without the need for port translation,
  • Video encoding format is H.264
  • 1 Mp sensor, recorded video resolution – 720p (1280×720 px);
  • Double IR-CUT filter.
    The packaging of the camera is a standard design for cameras of this form factor from Sinocam:
    They are in more detail with seller website: I bring to your attention a review of a 1-megapixel Wi-Fi IP camera from Shenzhen Sinocam Technology, a Chinese manufacturer whose main specialization is security cameras and additional equipment for them. There have already been reviews of cameras from this company on MySku, but this particular model has not yet been considered, so I hope you will be interested. Automatic switching of day and night modes,
  • Two-stream encoding.
Categories
ads

Christmas snowflake on ws2812 “Snowflake”

But cheap, compact, a lot of memory. As a frame – an aluminum strip from a construction store. Yes, and winter on the street is not conducive to shooting with trembling hands at a large zoom. And on the fourth, the data wire from the far end of the beam returns. It is enough to smoothly change the color value H, leaving the saturation S and brightness V at the maximum. But repeating ready-made designs is not as interesting as reinventing your own bicycles.
Palettes for effects are set from 6 colors in HSV. Up to a hundred diodes, 4 kilobytes of RAM is enough, but 150 are already back to back, there will be no left for effect calculations. Comrades from Belarus may like it, but be careful if you decide to repeat it. This is the cheapest version of the address tape. I didn’t think that I would offer a snowflake for repetition, but if anyone suddenly wants, it will be easier for him, all sorts of NodeMCUs are widespread, the code can be quickly tweaked to your liking in the Arduino IDE, which is much easier for a beginner than installing Keil or PlatformIO, which I used. Overengineering, you say? Well, it seems like yes. On the reverse side, it looks like this, sorry for the unwashed flux, hot-melt adhesive, dirty cable … divay from the inside – it’s like this: You can set both a rainbow and a palette of three and two colors, repeating the desired colors.
I decided to make the central part collapsible. From this
ebrombaugh.studionebula.com/embedded/lightshow/index.html of the project. I took 20 * 2 mm, three pieces of 2 meters each, a meter piece remained.
The connectors and the central washer are printed on the printer. It looks better live, the camera does not extend the range of brightness and overexposes, it makes the areas next to the diodes white. Probably STM32F103Cx, which is on BluePill, would fit, 20KB of memory, 72MHz. Without them, my tape would have been lying unused. And with its rich periphery, you can also shift the entire management of the tape to hardware. Each ray and its cover are printed separately; to print the whole snowflake is not enough for the 20×20 cm print area of ​​my printer. I wanted to make sure that one effect smoothly transitions into another. Or a Coca-Cola palette of pure reds and whites. Well, next year I decided to make a bigger snowflake. But she survived, even without damage. The effects themselves, of course, I sharpened for a circular pattern, which has a center and which looks good, for example, rotation. But then I also added effects like a “waving flag”, which would fit even better on a rectangular decoration than on a snowflake. So it’s not in vain. The eye perceives brightness non-linearly. I printed with white PETG, with a thin layer it works well as a diffuser, the brightness of the diodes is enough with a margin. Power for the side diodes can be taken at any convenient point of the main branch, I tried so that the wires crossed less. There is only one minus of this approach, due to the peculiarities of the ws2812b protocol, a lot of memory is required for the buffer, 24 bytes per pixel (one byte per color bit). For the snowflake, I added one more “coordinate”, from which you can determine what the diode belongs to, the central point, the main beam or side processes. I drew in Solid Works, not because it is so complicated. But here the change of effects usually happens instantly, there were “sparks”, suddenly bam, already a rainbow. This makes it much easier to make bright effects. It was then that my memory ceased to suffice. The FastLED library already has gamma correction, so I started using it. And the FastLED library, although sometimes criticized for being monstrous, supports different types of controlled tapes, which makes the firmware more versatile. In Leroy, he now shows me the price of 122 rubles for a two-meter one, 75 rubles for a meter one.
PWM on video, especially on blue color, it’s only on the camera. Or do it harshly, weld everything from a steel strip. And what else do I like espshki, they are easier for beginners. You can at least make a matrix, at least an inscription, at least a snowflake. The frost on the glass of the balcony dissipates the diodes well and it is easier to photograph them this way. I did not plan to join the movement, but, having boasted in the comments and picked up pluses, I will have to justify it.
At first I tinkered, choosing the most successful wire topology, but then things went faster.
It took exactly 5 meters of tape, with the same density of 30 diodes per meter. The rays are then glued to the central part. No, it was possible to shove in, I’m sure. This seems to me sufficient, given that the gaps between them are interpolated. But the flow of one effect into another in itself gives bizarre effects, sometimes successful, sometimes not. ATmegas are not famous for their memory. Connection from the reverse side:
If you want to repeat, you can use a scarf from the Chinese, there are a lot of them on Ali, the price is around 3 dollars. But I ended up choosing esp8266 as an ESP-07 module. But you can also use it, use it as an input for color music. The brightness of the previous effect decreases, and the next one increases. No, the effects are beautiful, there are no questions. I calculated the colors of the diodes for the next frame in the software, prepared everything in the buffer, gave a command to the hardware – and it itself sends it all to the tape, but while it is being sent, you can already read the next frame. There is no diffuser cover above the tape, it is not required for admiring from a long distance, the LEDs blind only up close. And cut the central part out of plywood. Although, it seems to me, now it is not so difficult to find someone nearby who will print. But mine was also with gradations of brightness, dynamic indication of layers simultaneously with the PWM of individual diodes. To make it look like this (the point of a small snowflake is just visible two windows to the right): This is a breadboard directly under esp8266 and stm32f030. I tried both WLED and Christmas tree firmware from Jason Coon (Evil Genius Labs). It is convenient to do it in different colors, power is red and black, yellow is a control signal.
But then I added another diode, the 31st, in the center. In a small snowflake, I made the simplest correction by powers of two, the calculated brightness in the range of 0-255 turns into ten fixed levels: 0, 1, 2, 4, 8, 16, 32, 64, 128, 255.
Of course, I didn’t come up with anything fundamentally new. As for the extra Wi-Fi, yes, let it be, although it is not needed. Diode coordinates are calculated both in Cartesian coordinates (0-255 in X and Y) and in angular coordinates (angle from the vertical and distance from the center, both parameters are 0-255). For a shape such as a snowflake, it is easier to manually set the angular coordinates, and programmatically convert to Cartesian. If only such a snowflake did not fall on someone.
In the center we collect a red and black round dance. Or to update the firmware, if later you want to add effects without removing it from the window.
The case is printed. Until it came in handy, it hung on the balcony until the hot melt adhesive softened in the summer and it did not
fell down. For example, white, blue and red for the flag. Only when preparing illustrations for Not ideal, but in practice it gives quite a decent result. Careful
the entire wiring is obtained if done as on the lower left beam.
In principle, 31 diodes is not much, the classic arduino (ATmega168) should be enough. So, this time I got lazy and decided
just take something bigger. Not very convenient, but it turned out much nicer. Looks much more interesting. (The video does not convey brightness well, but you can roughly understand: https://youtu.be/tFre3wmwgtU). A half-bright diode looks just a little less bright. There are a lot of such cubes on the internet. It is flashed via UART or a cheap ST-Link programmer. This is due to the protocol used by the WS2812 when emulated via UART or timer->dma->pwm. The snowflake has 6 rays, 5 lights for each. LED strip with addressable diodes that can be controlled individually has been around for a long time. I started with a "room" snowflake with a diameter of about 24 cm. I took the LED control code ready, I was too lazy to write it myself. One can be easily converted into another programmatically. And I have more than a hundred of them in stock, for me – a workhorse. This can also be used in effects.
In each beam, the connection scheme is similar to a small snowflake. Three pins are soldered directly to the tape, ground, data, 5 volts. Those. hue, saturation, brightness. First, the main branch, then two side branches and back to the next beam. Therefore, it was easy for me to scale a small snowflake into a large one using the same code. For other patterns, it may be easier on the contrary, to fill in the X-Y constants, and programmatically recalculate into angular ones. Effects are calculated in 2D coordinates. On the contrary, I was only studying this system then, so I trained on simple models. At the same time, for some time, both effects move along their programs simultaneously. In RGB, this is very inconvenient to consider. Who cares, but I don’t like this option.
Soldering it is quite dreary and long, a lot of wires need to be measured to the desired length, cleaned and soldered. This requires somewhat more computing power. In case you need to remove or transport a snowflake somewhere. It is enough just to calculate (with pens, a ruler or in some program) the coordinates of the lights in space. The signal channel is connected in a certain order, the output of one piece with the beginning of the next. I took a scarf for the microcontroller from what was at hand. Did for myself. But it adds variety. 
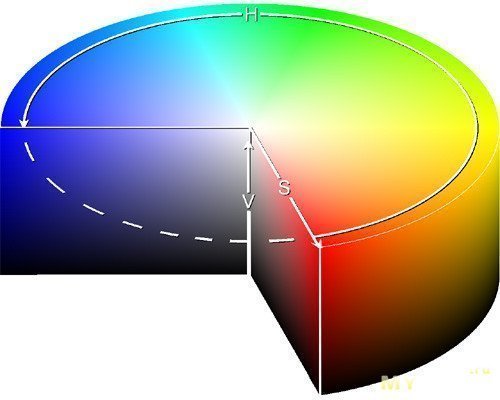
The number of reviews on homemade garlands has doubled. So far I am not using it. Colors for animation are considered in HSV coordinates. I did it on the basis of using 1 meter of low density tape, only 30 diodes per meter. This approach is awesome in that the firmware is easy to modify for any number of diodes arranged in an arbitrary way. You can take a strip with a margin, fold it with an overlap and twist it with bolts from the sides of the tape. I’m not sure that many people want to repeat, but I hope it will be interesting to look. Acrylic and laser cut by sav13, 3D printing by An_private, for example. And it will work.
What I don’t like about the projects I’ve seen is the animation. For example, a smooth transition between red and blue goes through all the shades of the rainbow, through orange, yellow, green. On the decoration, such a simplification is completely imperceptible. For three dozen diodes, it is not so necessary, but very convenient. And I have nothing to be proud of. Such a snowflake looks good indoors, but when I hung it on the window, I looked from the street and realized that at a height of 12 floors it looks like a slightly iridescent speck. A snowflake, what to take from it, it should fall, this is their job. Video filmed from inside. That’s what I did. In the end, I was motivated to make this Christmas decoration, not least by the local reviews of past years. In optimization I can and I know how. Yes, and beauty is not particularly required, it is not visible from the street, far away, and from the inside of the room the inside is quite decent. The very first beam starts from the central diode. For example, I made an LED cube of 8 * 8 * 8 diodes on ATmega32U4. In the center it is connected by a spider like this (and yes, I know that the spider has 8 legs, mine is just a victim of a merciless diiva): Well, the idea to make New Year’s snowflakes based on it has long been successfully implemented, including here, on mysku. But I chose the stm32f030f4p6 microcontroller. I tried to take the "brains" from a small snowflake and connect it to a new one. It then cost a penny, 69 cents, so I bought a couple of dozen and used it in various crafts. 16KB for firmware, 4KB of memory, a fairy tale for such money. I’ll leave it as is. STM32F100 with more than 8KB of RAM come in large cases, which is also some kind of overengineering, given that only one pin is needed to control the tape. I drew in OpenSCAD, if anything, it should be easy https://jiji.co.ke/shoes/formal to correct for a different stripe width. Yes, and parts are easier to print, as for me. Two of them then decorated the cafe until the pandemic killed it. The main thing is to connect the power of all three pieces of tape on each of the 6 beams. Yes, and their prices were growing even before the silicon crisis, not to mention the deficit now. What pleases, there is the same amount of soldering, although the size is 5 times larger. So not interesting. Before output, it is still desirable to slightly adjust the gamma.

Christmas snowflake on ws2812 "Snowflake"

Astrologers have announced New Year’s Eve weeks. So I fixed the occasions with hot glue, only so that they do not fall into the light of the diodes, do not overlap them. The design is simple, special accuracy is not needed, there should be no problems.
To be able to disconnect the wires, I soldered the usual 2.54mm pins. 4 pins per beam. I use them in LazyRolls curtain drives. For each LED in the firmware, the coordinates are calculated, and the color is determined from them at each moment of time for each LED. It may be worth replacing it with a more compact option, but it works – don’t touch it. Don’t have a printer? What kind of divay without a printer then? Kidding. As a result, I mastered 3 such snowflakes. Thanks to the authors for inspiration and motivation.

Categories
ads

Key chain with a clock in the form of a folding owl


I forgot what this font is called, but I saw a similar one on an old Soviet-made mechanical alarm clock. The product is made in the form of a neat owl with folded wings. 
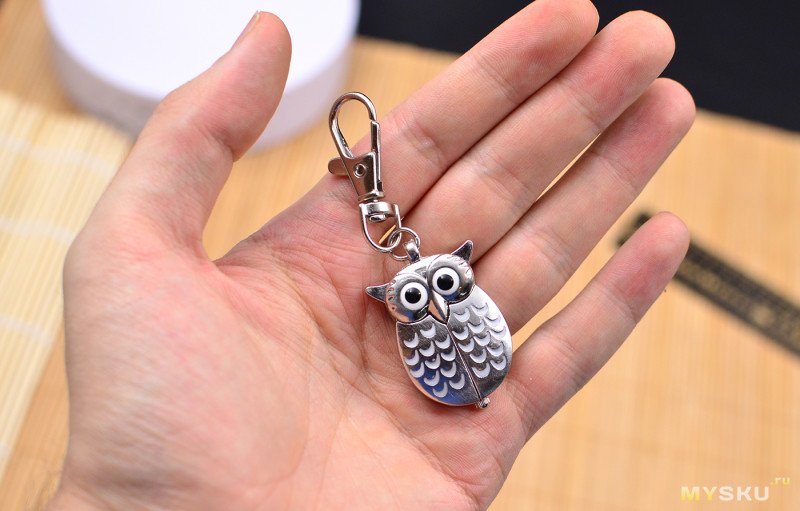
Inside is a simple clock face, consisting of hour, minute and second hands. 
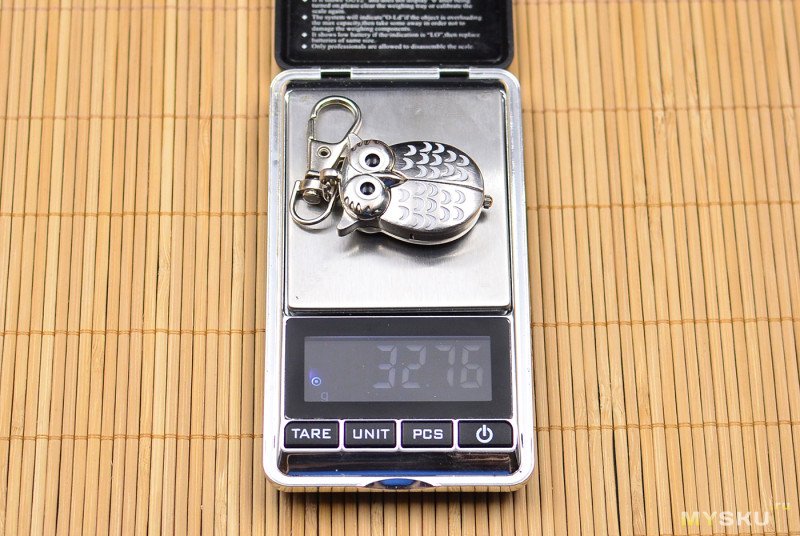
The assembly feels like a monolith, nothing wobbles. 
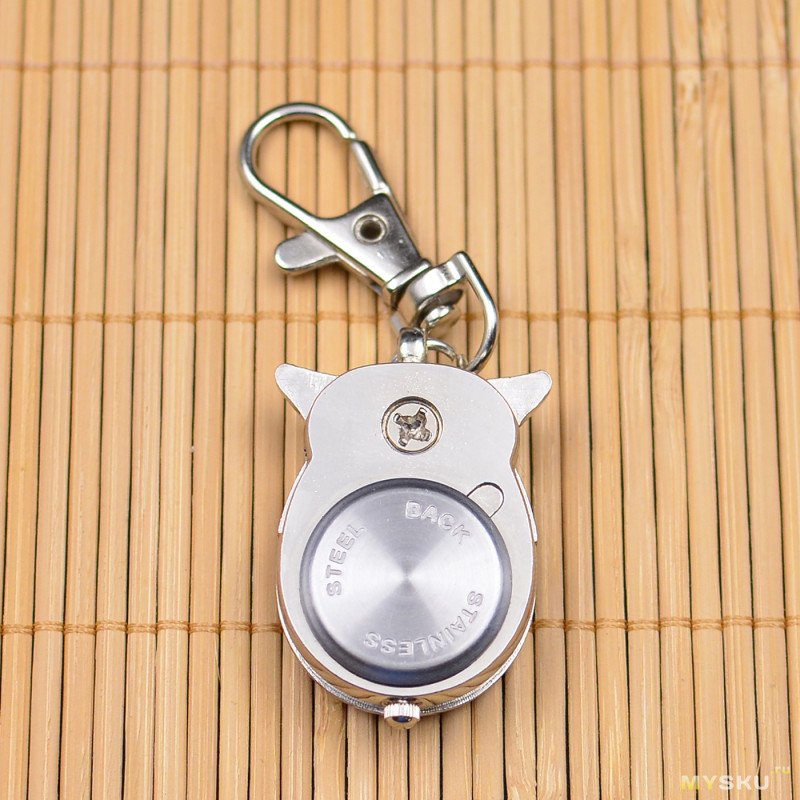
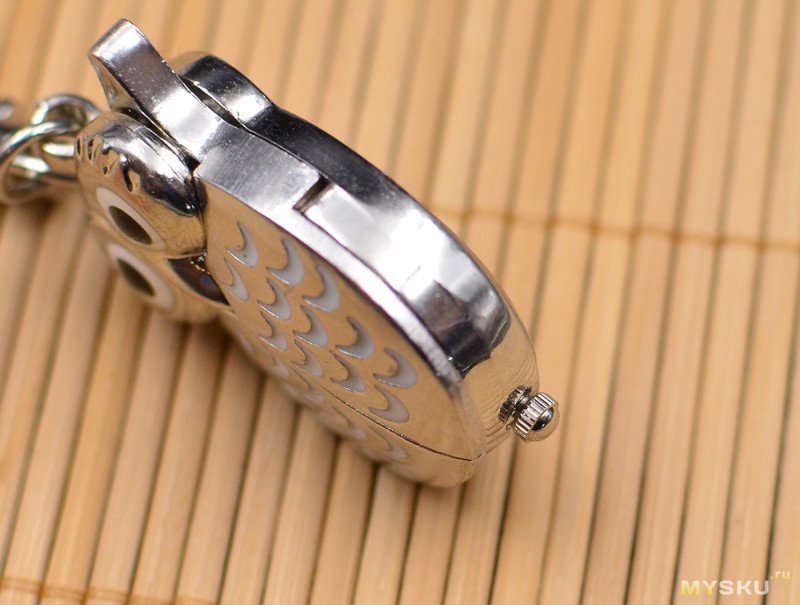
The parcel was sent in the form of a regular envelope. On the reverse side there is a cross screw for adjusting the clamping force of the sliding wings, a removable cover for access to the insides. The eyes of an owl and the contours of its plumage on the wings are covered with enamel, it does not lend itself to a nail. Owl measures about 2.5 x 3.5cm Quartz movement To open the wings, you need to take hold of the feather "ears" https://jiji.co.ke/computers-and-laptops/hp-probook-650-g3 of the owl and bring them together. The metal is claimed to be just an alloy, but is magnetic.

Key chain with a clock in the form of a folding owl

Weight a little less than 33 grams
There is a carabiner for attaching to keys. They asked to order jewelry from aliexpress, and while the parcels were in the process of being delivered to the customer, I decided at the same time to make a mini-review on one of the lots – a keychain in the form of an owl with a hidden clock. The "peep" from below is just a retractable peg for setting the time Delivery from the moment of ordering on 11.11 took a long time, 2 months.

Categories
ads

Overview of a suitable thermos ONEISALL for 900ml

The thermos was so-so, it didn’t hold heat at all, a maximum of 4 hours, and if you open the lid, it cools down even faster. At the bottom, the corresponding marking "AISI 304" is embossed.
Both the inner and outer parts of the thermos are made of stainless steel. They bought it then a long time ago on the market, some kind of 1.2-liter noname with a large plastic handle. Having chatted, twisted, turned up and down, the thermos did not leak, everything is completely sealed. Usually I use a thermos at home brewing all sorts of herbs, rose hips (for immunity, by the way, a very useful thing, especially in winter!). Small tea leaves do not pass through it. As a result, I found the optimal one in terms of volume and price like this: Very beautiful, comfortable to hold in the hand, there is a strap. 
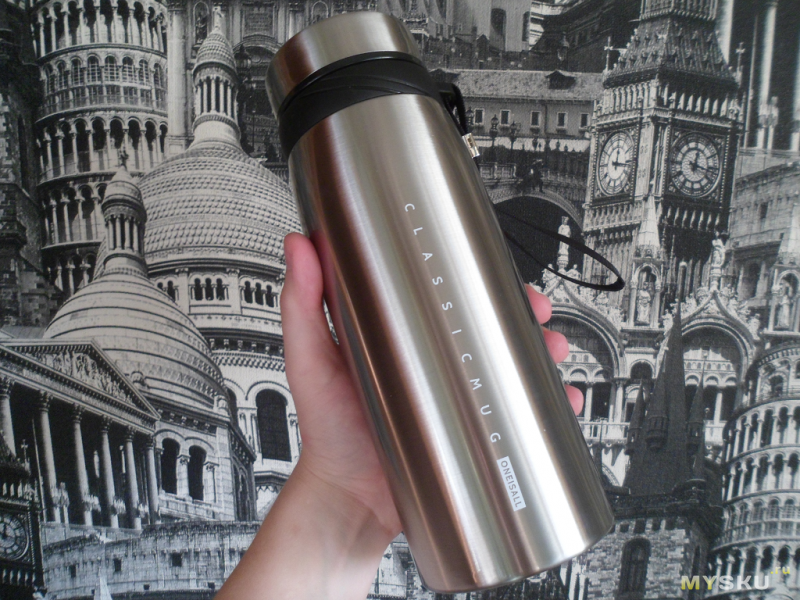
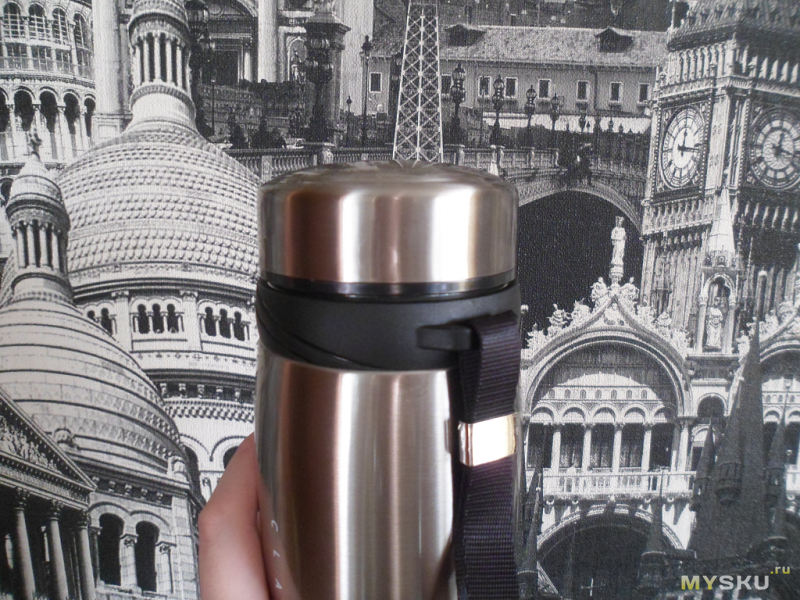
A rich selection of colors, you can take blue and red, even pink. The packaging was good. Suddenly, somewhere on the road, for example, it will come in handy, or on a hike. Prior to that, before the first use, I swirled plain boiling water in it so that it would not smell like China and be clean. Testing Recently, I had a question about buying a new thermos, because the plastic cover of the old one https://tonaton.ug/s_20-tables melted and it became pointless to use it further. In terms of the quality of the thermos, in general, you can put a well-deserved five! After 20 minutes after closing the lid, it warmed up a little (up to about 35 degrees).
The lid of the thermos is metal with a plastic plug. The body itself during the whole time did not heat up and was cold, and this is undoubtedly a big plus! At about 18:00, I put a handful of rose hips, a little hawthorn into a thermos and pour boiling water over it.
The strainer inside is inserted easily. The choice on Ali was very https://jiji.co.tz/287-coffee rich, but mostly some kind of trifle. The thermos itself weighs 430 grams, volume 900ml, size 20x9cm But I took the classic silver, it also looks pretty good. Hello everyone! I decided to make a review on a very useful and necessary thing for every person, on a metal thermos of the ONEISALL brand. I’ll tell you about everything in detail under the cat.

Overview of a suitable thermos ONEISALL for 900ml

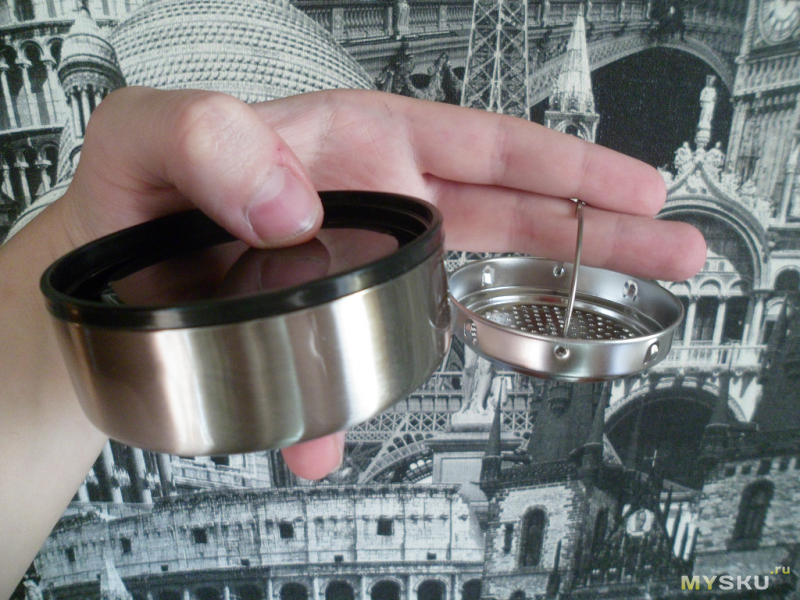
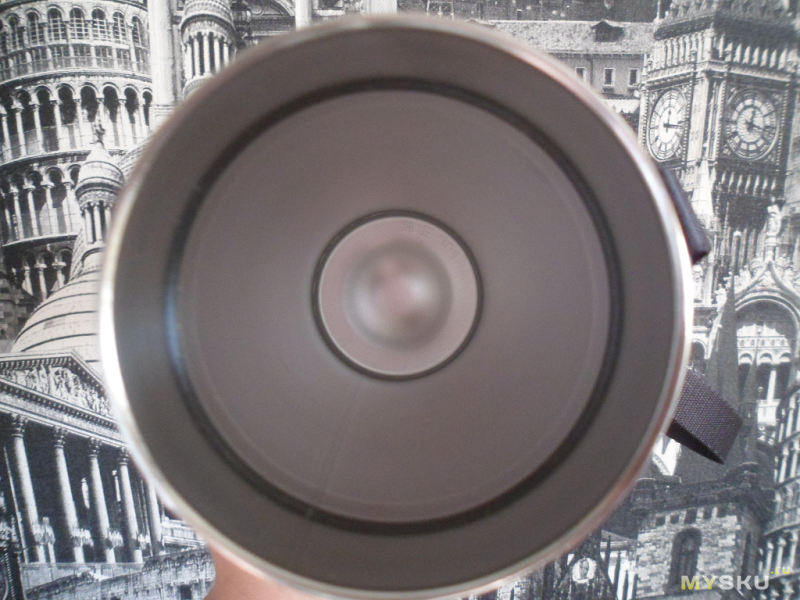
You can’t use it as a glass, which is a small drawback, but in addition there is a convenient tea strainer in the kit. Put the strainer on and screwed the lid on tightly. It is allowed to fill liquid up to the top of the sieve. You can strain the tea immediately when pouring, or at the very end before drinking. I began to look for a replacement so that the volume was normal, it was convenient to carry with me, and most importantly, it kept warm for a long time. Also inside https://tonaton.ug/s_38-knitting-and-crochet-yarns was a small brochure in Chinese and a bag of silica gel.