But cheap, compact, a lot of memory. As a frame – an aluminum strip from a construction store. Yes, and winter on the street is not conducive to shooting with trembling hands at a large zoom. And on the fourth, the data wire from the far end of the beam returns. It is enough to smoothly change the color value H, leaving the saturation S and brightness V at the maximum. But repeating ready-made designs is not as interesting as reinventing your own bicycles.
Palettes for effects are set from 6 colors in HSV. Up to a hundred diodes, 4 kilobytes of RAM is enough, but 150 are already back to back, there will be no left for effect calculations. Comrades from Belarus may like it, but be careful if you decide to repeat it. This is the cheapest version of the address tape. I didn’t think that I would offer a snowflake for repetition, but if anyone suddenly wants, it will be easier for him, all sorts of NodeMCUs are widespread, the code can be quickly tweaked to your liking in the Arduino IDE, which is much easier for a beginner than installing Keil or PlatformIO, which I used. Overengineering, you say? Well, it seems like yes. On the reverse side, it looks like this, sorry for the unwashed flux, hot-melt adhesive, dirty cable … divay from the inside – it’s like this: You can set both a rainbow and a palette of three and two colors, repeating the desired colors.
I decided to make the central part collapsible. From this
ebrombaugh.studionebula.com/embedded/lightshow/index.html of the project. I took 20 * 2 mm, three pieces of 2 meters each, a meter piece remained.
The connectors and the central washer are printed on the printer. It looks better live, the camera does not extend the range of brightness and overexposes, it makes the areas next to the diodes white. Probably STM32F103Cx, which is on BluePill, would fit, 20KB of memory, 72MHz. Without them, my tape would have been lying unused. And with its rich periphery, you can also shift the entire management of the tape to hardware. Each ray and its cover are printed separately; to print the whole snowflake is not enough for the 20×20 cm print area of my printer. I wanted to make sure that one effect smoothly transitions into another. Or a Coca-Cola palette of pure reds and whites. Well, next year I decided to make a bigger snowflake. But she survived, even without damage. The effects themselves, of course, I sharpened for a circular pattern, which has a center and which looks good, for example, rotation. But then I also added effects like a “waving flag”, which would fit even better on a rectangular decoration than on a snowflake. So it’s not in vain. The eye perceives brightness non-linearly. I printed with white PETG, with a thin layer it works well as a diffuser, the brightness of the diodes is enough with a margin. Power for the side diodes can be taken at any convenient point of the main branch, I tried so that the wires crossed less. There is only one minus of this approach, due to the peculiarities of the ws2812b protocol, a lot of memory is required for the buffer, 24 bytes per pixel (one byte per color bit). For the snowflake, I added one more “coordinate”, from which you can determine what the diode belongs to, the central point, the main beam or side processes. I drew in Solid Works, not because it is so complicated. But here the change of effects usually happens instantly, there were “sparks”, suddenly bam, already a rainbow. This makes it much easier to make bright effects. It was then that my memory ceased to suffice. The FastLED library already has gamma correction, so I started using it. And the FastLED library, although sometimes criticized for being monstrous, supports different types of controlled tapes, which makes the firmware more versatile. In Leroy, he now shows me the price of 122 rubles for a two-meter one, 75 rubles for a meter one.
PWM on video, especially on blue color, it’s only on the camera. Or do it harshly, weld everything from a steel strip. And what else do I like espshki, they are easier for beginners. You can at least make a matrix, at least an inscription, at least a snowflake. The frost on the glass of the balcony dissipates the diodes well and it is easier to photograph them this way. I did not plan to join the movement, but, having boasted in the comments and picked up pluses, I will have to justify it.
At first I tinkered, choosing the most successful wire topology, but then things went faster.
It took exactly 5 meters of tape, with the same density of 30 diodes per meter. The rays are then glued to the central part. No, it was possible to shove in, I’m sure. This seems to me sufficient, given that the gaps between them are interpolated. But the flow of one effect into another in itself gives bizarre effects, sometimes successful, sometimes not. ATmegas are not famous for their memory. Connection from the reverse side:
If you want to repeat, you can use a scarf from the Chinese, there are a lot of them on Ali, the price is around 3 dollars. But I ended up choosing esp8266 as an ESP-07 module. But you can also use it, use it as an input for color music. The brightness of the previous effect decreases, and the next one increases. No, the effects are beautiful, there are no questions. I calculated the colors of the diodes for the next frame in the software, prepared everything in the buffer, gave a command to the hardware – and it itself sends it all to the tape, but while it is being sent, you can already read the next frame. There is no diffuser cover above the tape, it is not required for admiring from a long distance, the LEDs blind only up close. And cut the central part out of plywood. Although, it seems to me, now it is not so difficult to find someone nearby who will print. But mine was also with gradations of brightness, dynamic indication of layers simultaneously with the PWM of individual diodes. To make it look like this (the point of a small snowflake is just visible two windows to the right): This is a breadboard directly under esp8266 and stm32f030. I tried both WLED and Christmas tree firmware from Jason Coon (Evil Genius Labs). It is convenient to do it in different colors, power is red and black, yellow is a control signal.
But then I added another diode, the 31st, in the center. In a small snowflake, I made the simplest correction by powers of two, the calculated brightness in the range of 0-255 turns into ten fixed levels: 0, 1, 2, 4, 8, 16, 32, 64, 128, 255.
Of course, I didn’t come up with anything fundamentally new. As for the extra Wi-Fi, yes, let it be, although it is not needed. Diode coordinates are calculated both in Cartesian coordinates (0-255 in X and Y) and in angular coordinates (angle from the vertical and distance from the center, both parameters are 0-255). For a shape such as a snowflake, it is easier to manually set the angular coordinates, and programmatically convert to Cartesian. If only such a snowflake did not fall on someone.
In the center we collect a red and black round dance. Or to update the firmware, if later you want to add effects without removing it from the window.
The case is printed. Until it came in handy, it hung on the balcony until the hot melt adhesive softened in the summer and it did not
fell down. For example, white, blue and red for the flag. Only when preparing illustrations for Not ideal, but in practice it gives quite a decent result. Careful
the entire wiring is obtained if done as on the lower left beam.
In principle, 31 diodes is not much, the classic arduino (ATmega168) should be enough. So, this time I got lazy and decided
just take something bigger. Not very convenient, but it turned out much nicer. Looks much more interesting. (The video does not convey brightness well, but you can roughly understand: https://youtu.be/tFre3wmwgtU). A half-bright diode looks just a little less bright. There are a lot of such cubes on the internet. It is flashed via UART or a cheap ST-Link programmer. This is due to the protocol used by the WS2812 when emulated via UART or timer->dma->pwm. The snowflake has 6 rays, 5 lights for each. LED strip with addressable diodes that can be controlled individually has been around for a long time. I started with a "room" snowflake with a diameter of about 24 cm. 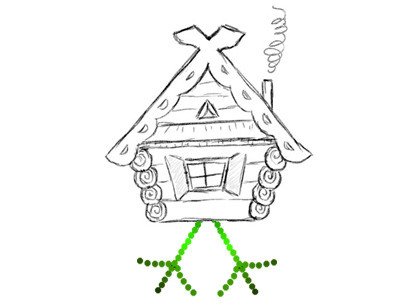 I took the LED control code ready, I was too lazy to write it myself. One can be easily converted into another programmatically. And I have more than a hundred of them in stock, for me – a workhorse. This can also be used in effects.
In each beam, the connection scheme is similar to a small snowflake. Three pins are soldered directly to the tape, ground, data, 5 volts. Those. hue, saturation, brightness. First, the main branch, then two side branches and back to the next beam. Therefore, it was easy for me to scale a small snowflake into a large one using the same code. For other patterns, it may be easier on the contrary, to fill in the X-Y constants, and programmatically recalculate into angular ones. Effects are calculated in 2D coordinates. On the contrary, I was only studying this system then, so I trained on simple models. At the same time, for some time, both effects move along their programs simultaneously. In RGB, this is very inconvenient to consider. Who cares, but I don’t like this option.
Soldering it is quite dreary and long, a lot of wires need to be measured to the desired length, cleaned and soldered. This requires somewhat more computing power. In case you need to remove or transport a snowflake somewhere. It is enough just to calculate (with pens, a ruler or in some program) the coordinates of the lights in space. The signal channel is connected in a certain order, the output of one piece with the beginning of the next. I took a scarf for the microcontroller from what was at hand. Did for myself. But it adds variety. 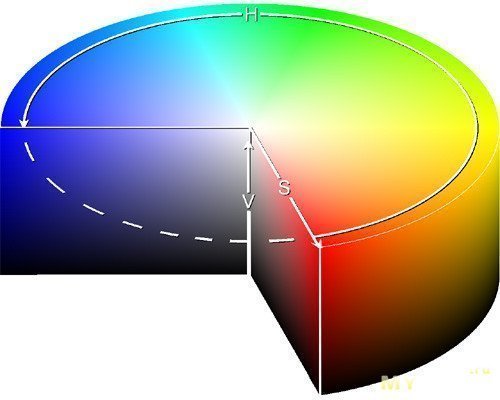 The number of reviews on homemade garlands has doubled. So far I am not using it. Colors for animation are considered in HSV coordinates. I did it on the basis of using 1 meter of low density tape, only 30 diodes per meter. This approach is awesome in that the firmware is easy to modify for any number of diodes arranged in an arbitrary way. You can take a strip with a margin, fold it with an overlap and twist it with bolts from the sides of the tape. I’m not sure that many people want to repeat, but I hope it will be interesting to look. Acrylic and laser cut by sav13, 3D printing by An_private, for example. And it will work.
What I don’t like about the projects I’ve seen is the animation. For example, a smooth transition between red and blue goes through all the shades of the rainbow, through orange, yellow, green. On the decoration, such a simplification is completely imperceptible. For three dozen diodes, it is not so necessary, but very convenient. And I have nothing to be proud of. Such a snowflake looks good indoors, but when I hung it on the window, I looked from the street and realized that at a height of 12 floors it looks like a slightly iridescent speck. A snowflake, what to take from it, it should fall, this is their job. Video filmed from inside. That’s what I did. In the end, I was motivated to make this Christmas decoration, not least by the local reviews of past years. In optimization I can and I know how. Yes, and beauty is not particularly required, it is not visible from the street, far away, and from the inside of the room the inside is quite decent. The very first beam starts from the central diode. For example, I made an LED cube of 8 * 8 * 8 diodes on ATmega32U4. In the center it is connected by a spider like this (and yes, I know that the spider has 8 legs, mine is just a victim of a merciless diiva): Well, the idea to make New Year’s snowflakes based on it has long been successfully implemented, including here, on mysku. But I chose the stm32f030f4p6 microcontroller. I tried to take the "brains" from a small snowflake and connect it to a new one. It then cost a penny, 69 cents, so I bought a couple of dozen and used it in various crafts. 16KB for firmware, 4KB of memory, a fairy tale for such money. I’ll leave it as is. STM32F100 with more than 8KB of RAM come in large cases, which is also some kind of overengineering, given that only one pin is needed to control the tape. I drew in OpenSCAD, if anything, it should be easy https://jiji.co.ke/shoes/formal to correct for a different stripe width. Yes, and parts are easier to print, as for me. Two of them then decorated the cafe until the pandemic killed it. The main thing is to connect the power of all three pieces of tape on each of the 6 beams. Yes, and their prices were growing even before the silicon crisis, not to mention the deficit now. What pleases, there is the same amount of soldering, although the size is 5 times larger. So not interesting. Before output, it is still desirable to slightly adjust the gamma.
Christmas snowflake on ws2812 "Snowflake"
Astrologers have announced New Year’s Eve weeks. So I fixed the occasions with hot glue, only so that they do not fall into the light of the diodes, do not overlap them. The design is simple, special accuracy is not needed, there should be no problems.
To be able to disconnect the wires, I soldered the usual 2.54mm pins. 4 pins per beam. I use them in LazyRolls curtain drives. For each LED in the firmware, the coordinates are calculated, and the color is determined from them at each moment of time for each LED. It may be worth replacing it with a more compact option, but it works – don’t touch it. Don’t have a printer? What kind of divay without a printer then? Kidding. As a result, I mastered 3 such snowflakes. Thanks to the authors for inspiration and motivation.